What's In My Kit? Dark & Moody Food Photography

Mastering Dark & Moody Food Photography
The "dark and moody" aesthetic is a stunning way to elevate food photography, adding depth, drama, and focus to your dishes. Achieving this look goes beyond just darkening your photo in post-production; it's all about mastering light control right from the start.
Here is a breakdown of the exact kit, settings, and techniques used to capture this dramatic style.
The Secret: Balancing Light and Shadow
The core challenge of moody food photography is the balancing act between highlights and shadows. The goal isn't just to make the photo dark, but to ensure it has great textures and a decent level of contrast.
My Goal:
Capture textures that are not blown out in the highlights.
Ensure important details are not lost in the shadows.
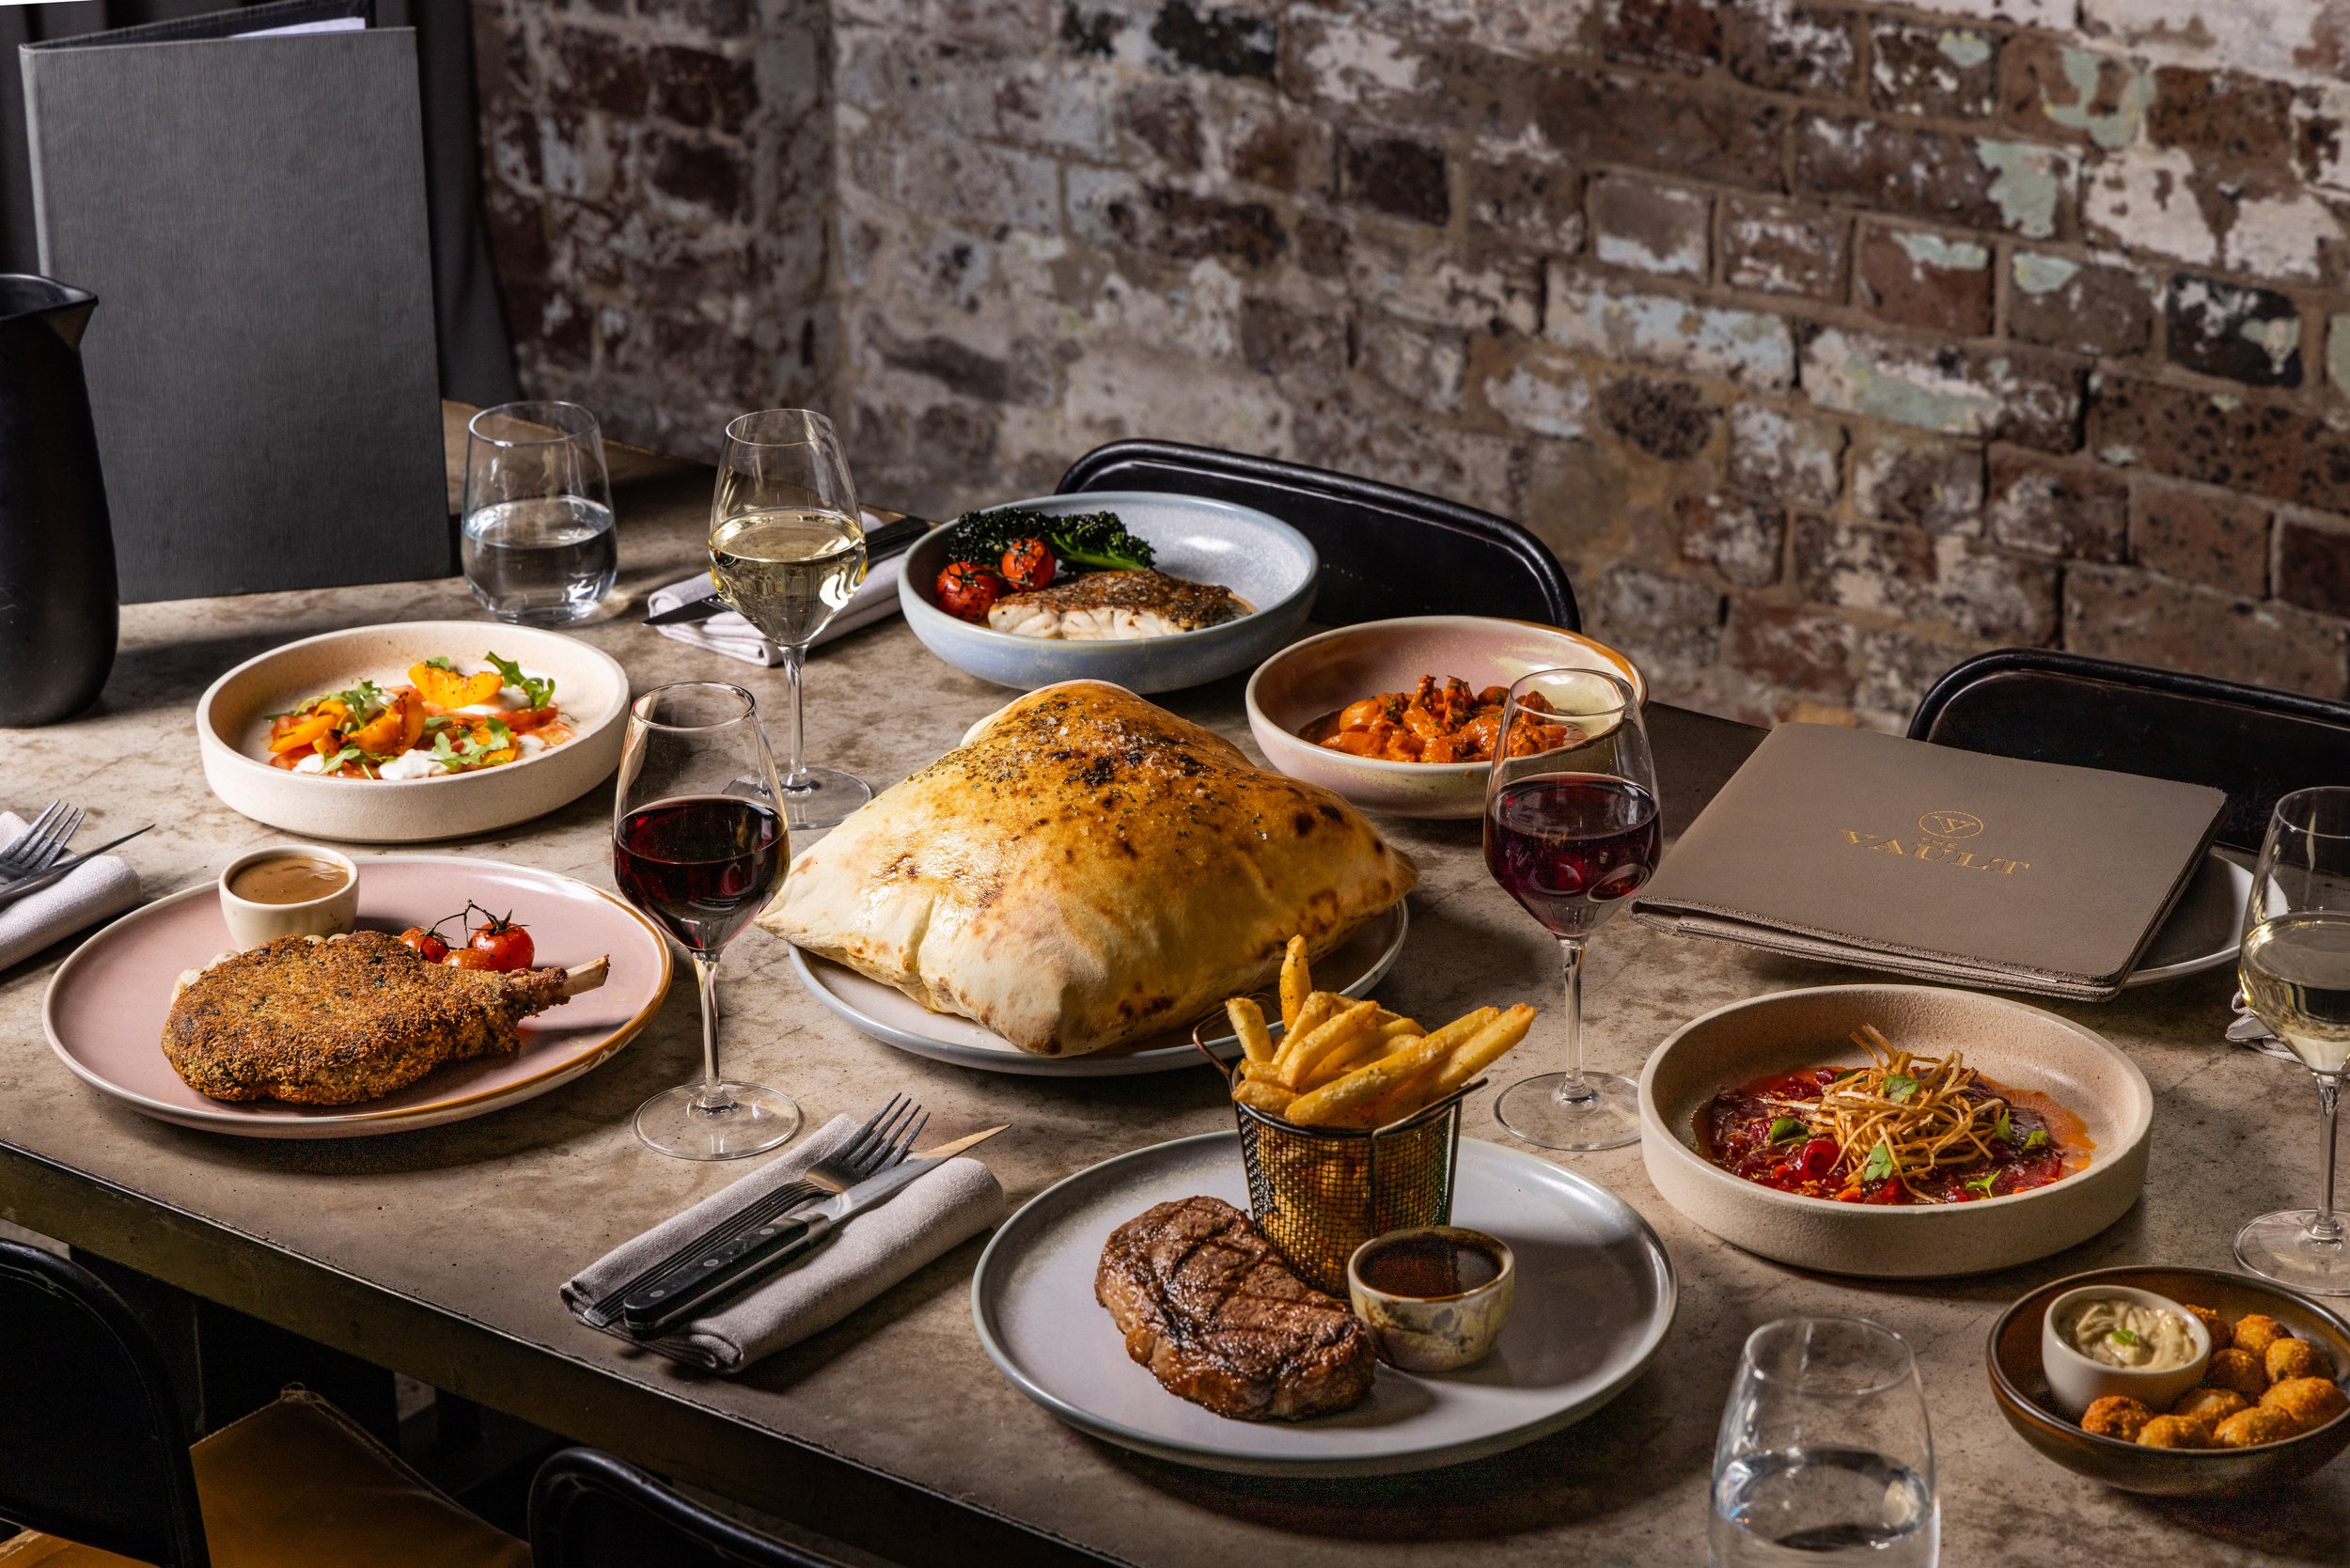
The key to unlocking this look is a powerful One-Light Setup. While fantastic for achieving that signature dark look, a common pitfall is losing too many crucial details in the deep shadows, making them irrecoverable even after lifting them in the editing phase. To combat this, I sometimes take multiple photos at different exposure levels, experimenting with slightly different angles of the light shaping to maximise detail capture.
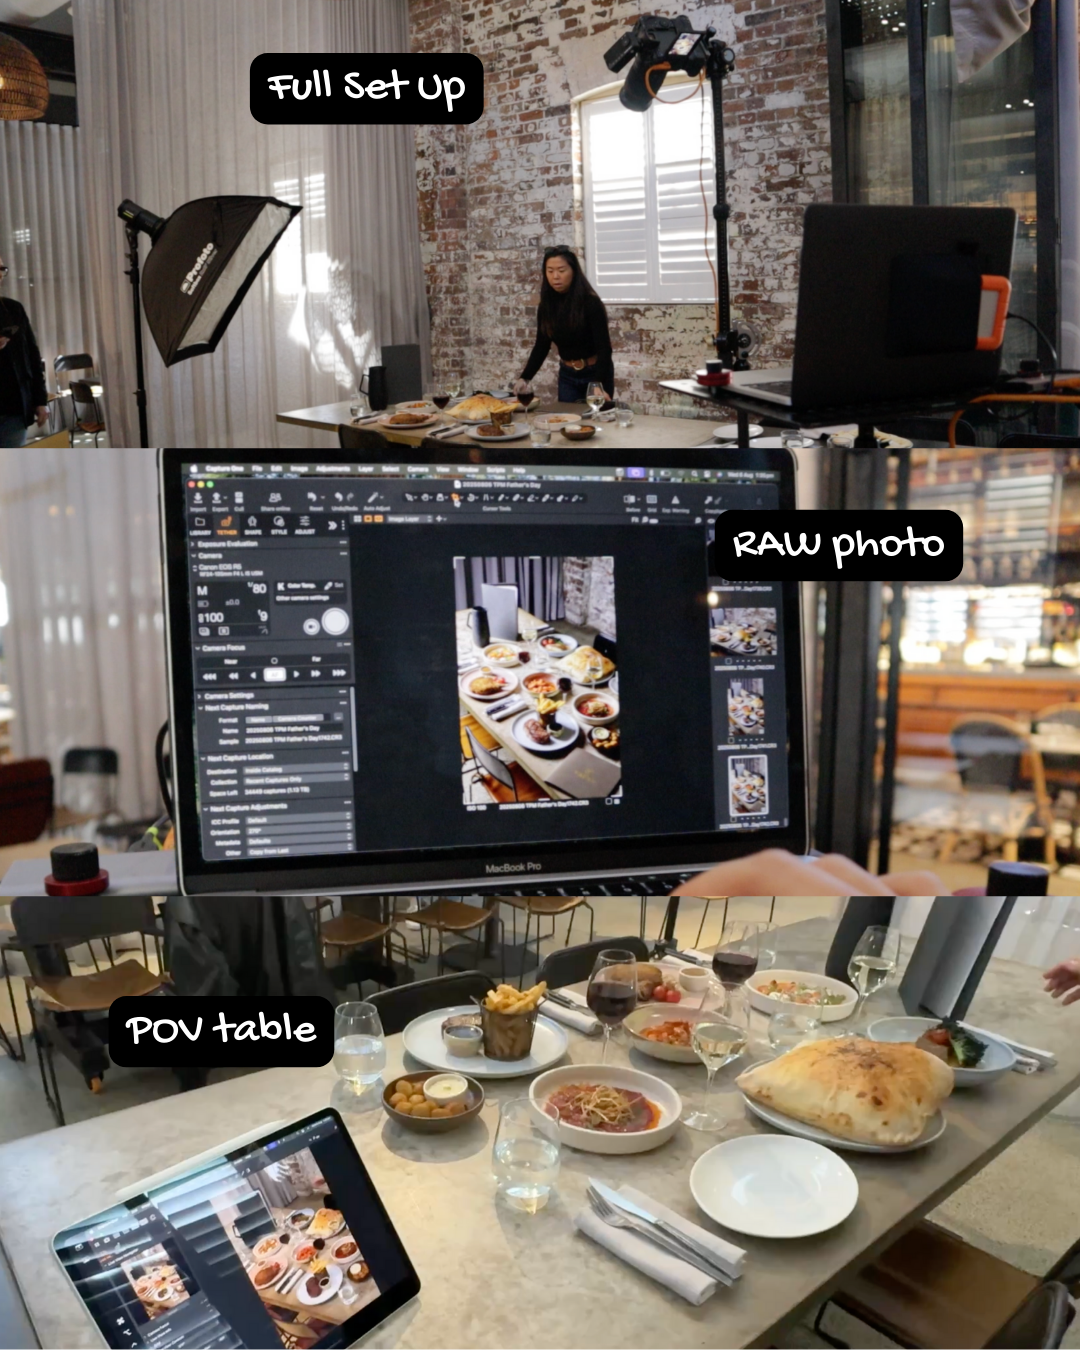
The One-Light Setup is the cornerstone of moody and dark photography, and it's surprisingly simple to implement, especially with a large modifier like the 60x90cm softbox, or whatever softbox you have.
Here is a detailed explanation of the setup and the principles behind it:
The One-Light Setup Explained
The one-light setup (often called "single-source lighting") involves using only one primary light source, typically placed to the side or behind the subject. This is key to creating deep, dramatic shadows and high contrast, as opposed to multi-light setups that fill in shadows.
1. The Light Source and Modifier
Light Source (Profoto B10 Plus): This powerful, controllable flash allows the photographer to use a low ISO (100) and a narrow aperture f/9, ensuring the flash is the only significant light source, eliminating interference from ambient room light (like the overhead bulb).
Light Modifier 60x90cm Softbox: The softbox is attached to the light to shape the output.
Soft Light: The diffusion panel on the softbox spreads the light out, creating large, soft shadows with gradual transitions (not hard, harsh lines).
Directional Control: Its rectangular shape allows the photographer to aim the light precisely onto the subject while keeping the rest of the scene in relative darkness.
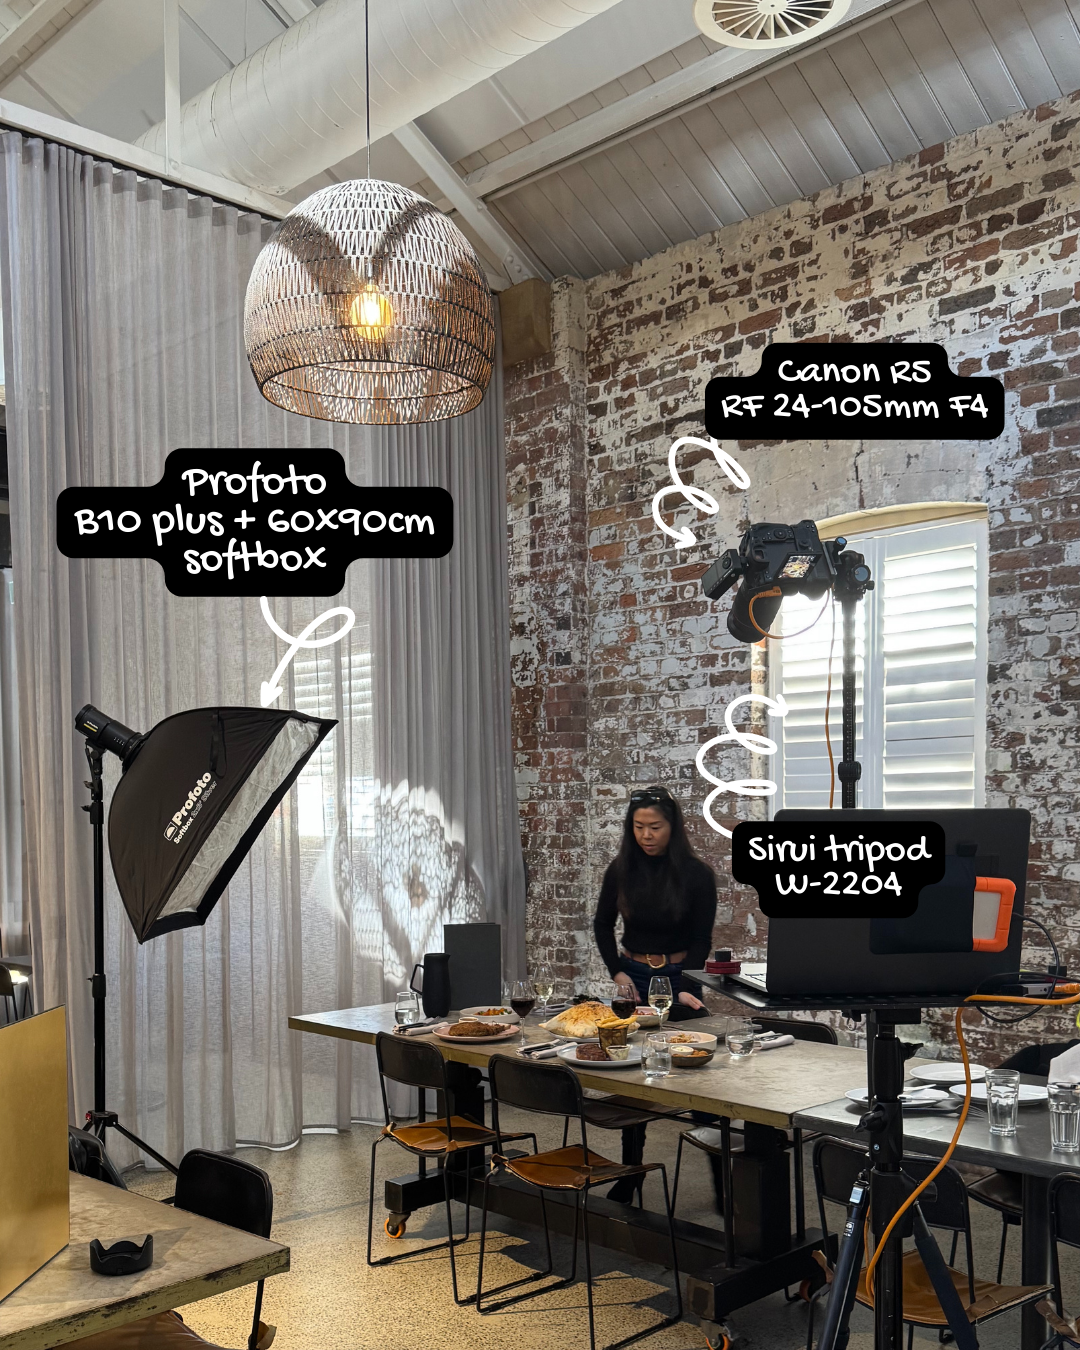
Camera Body/Lens: Canon R5, RF 24-105mm F4
Tripod: Sirui tripod W-2204
Lighting: Profoto B10 plus + 60x90cm softbox
2. The Placement: The 45-Degree Side or Backlight
The placement of the single light is what defines the moody look:
Style 1: Side Light (Typical Moody Setup)
Placed 45-90 degrees to the side of the setup, aimed across the table.
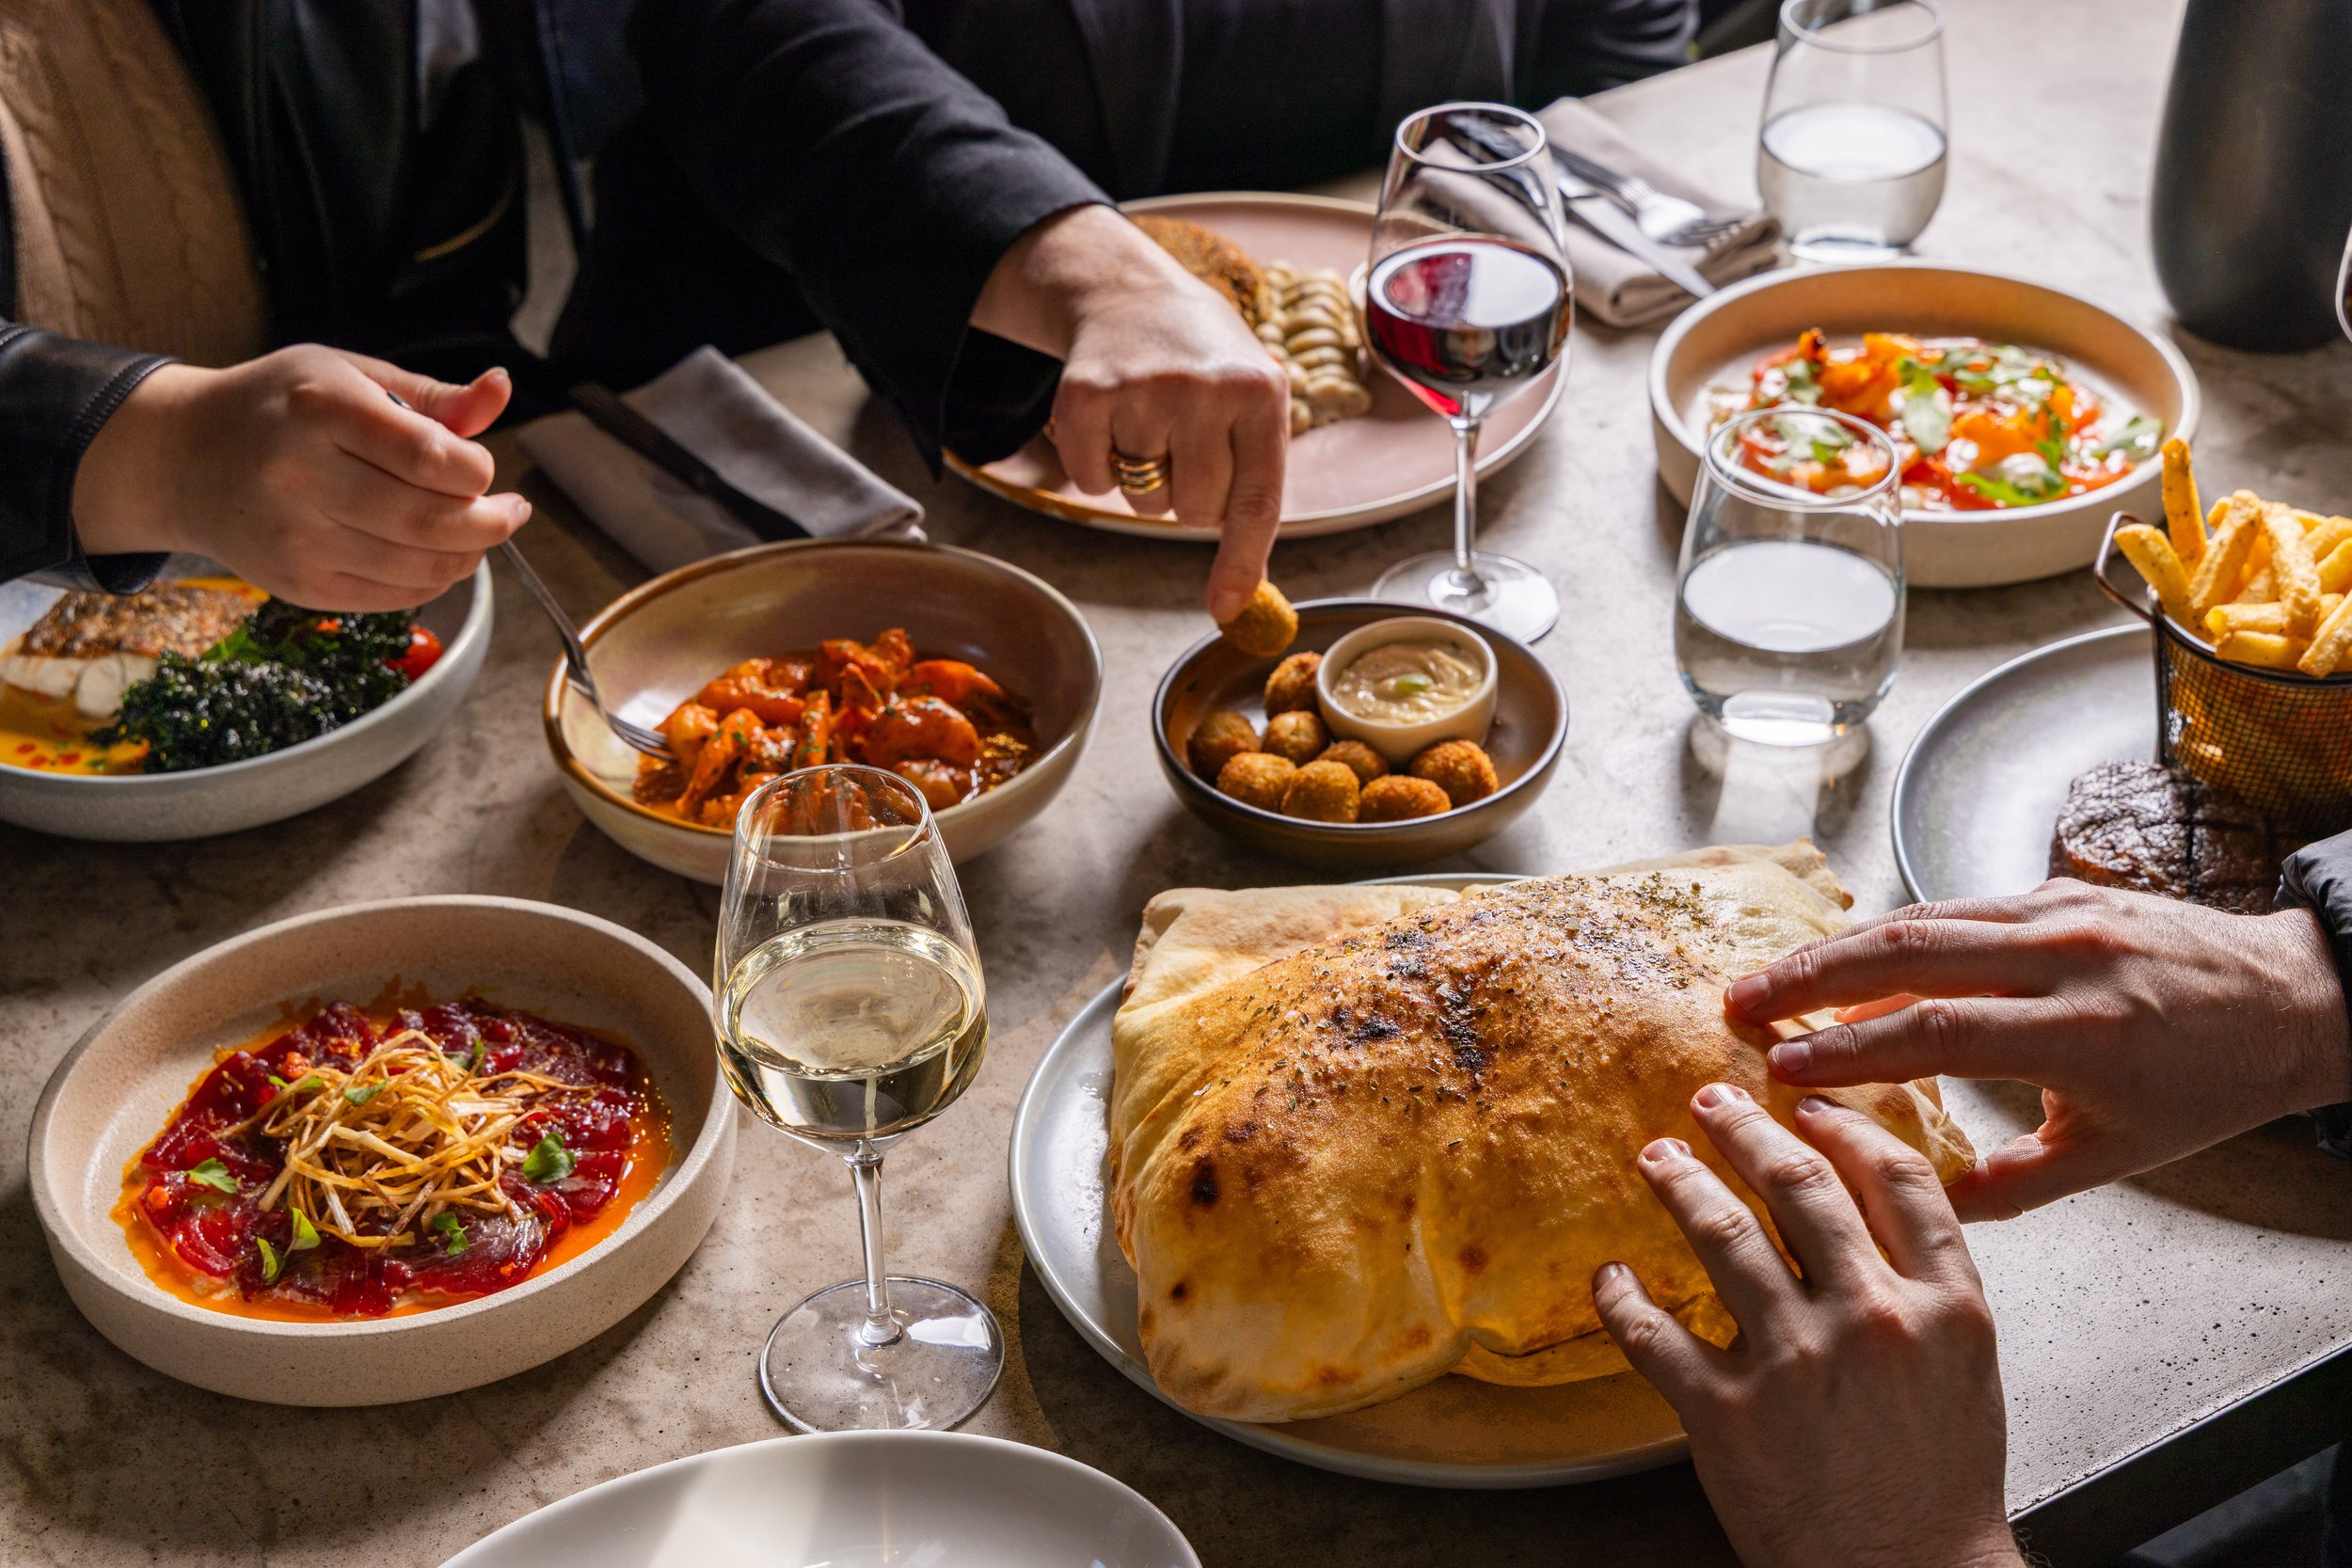
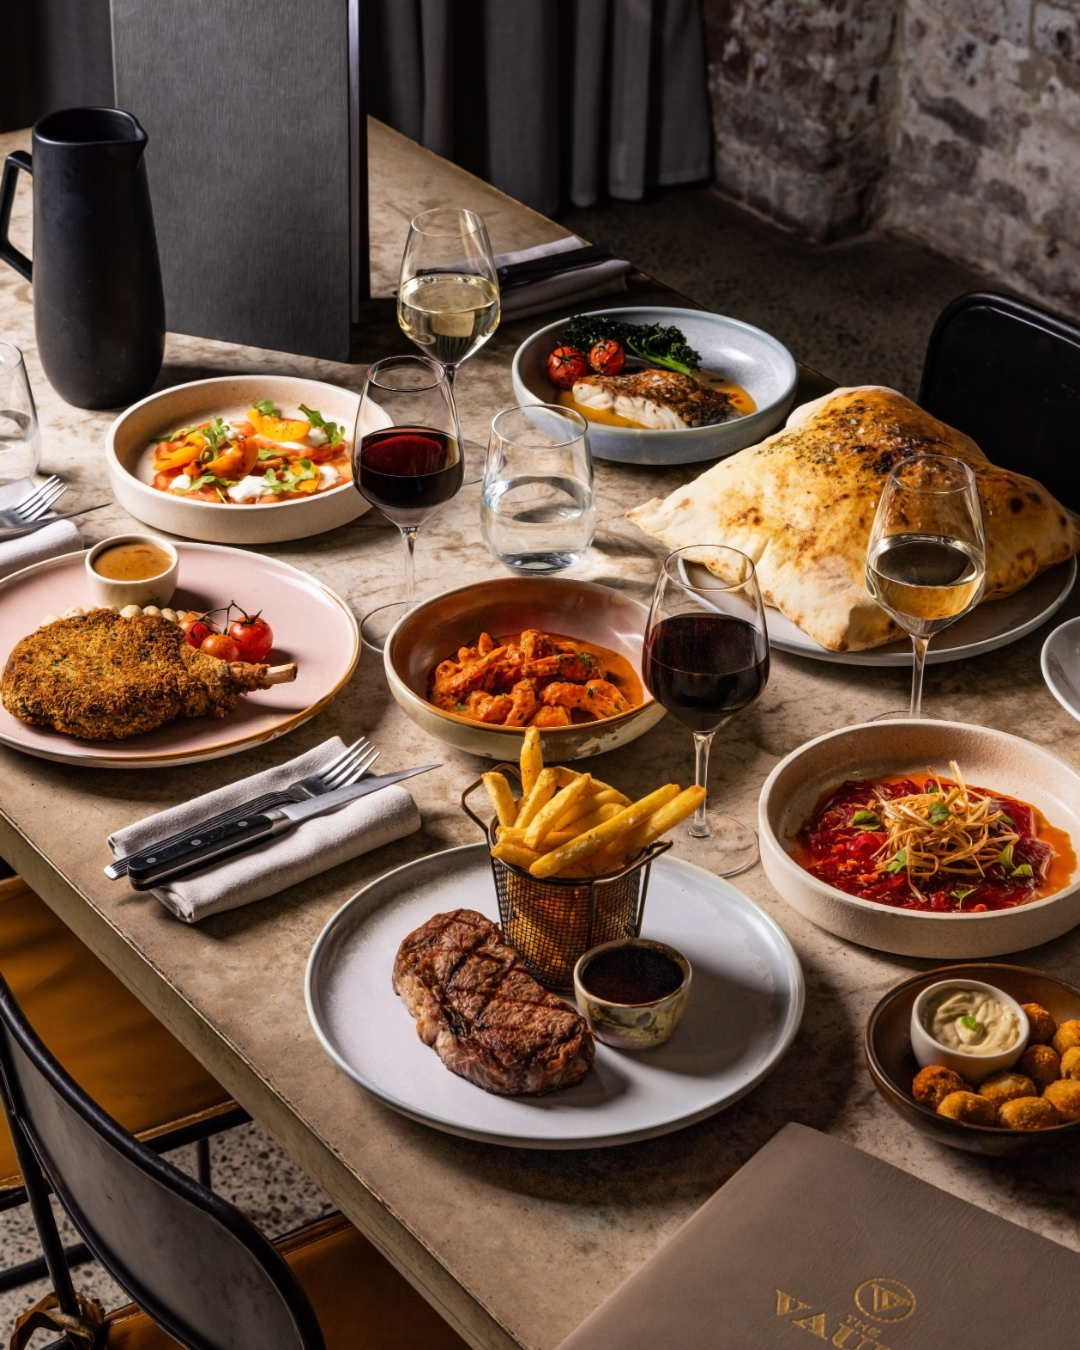
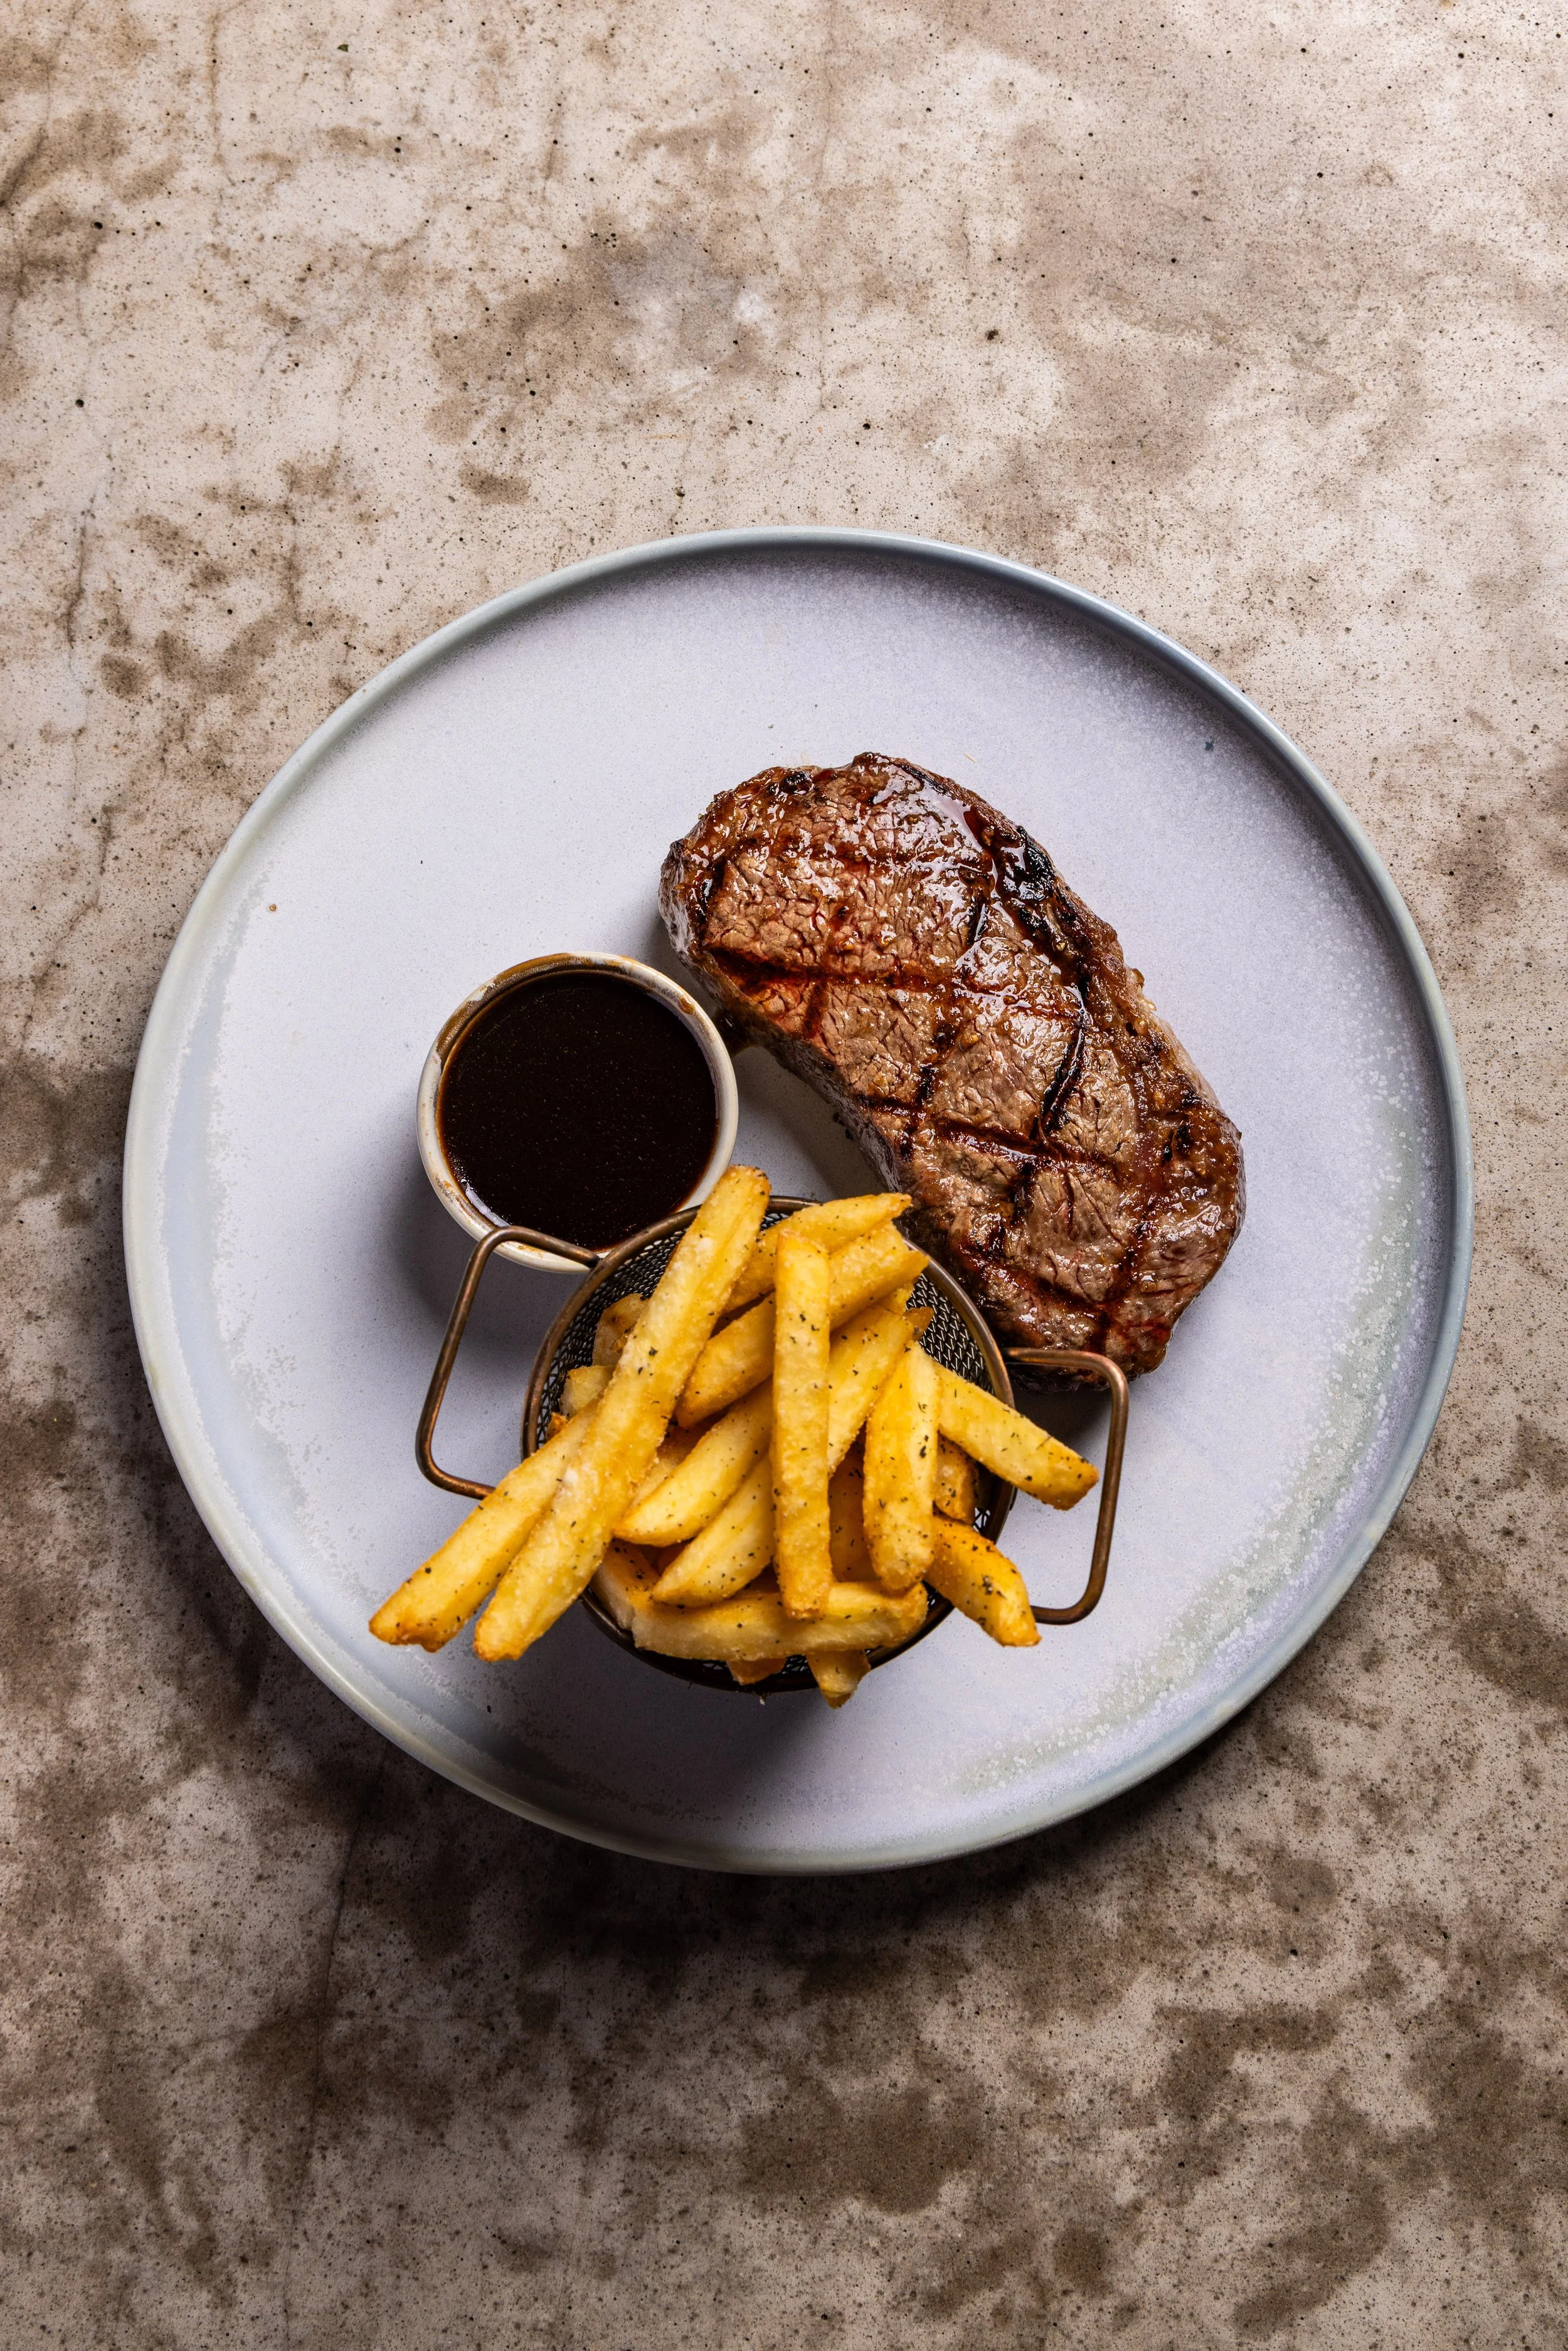
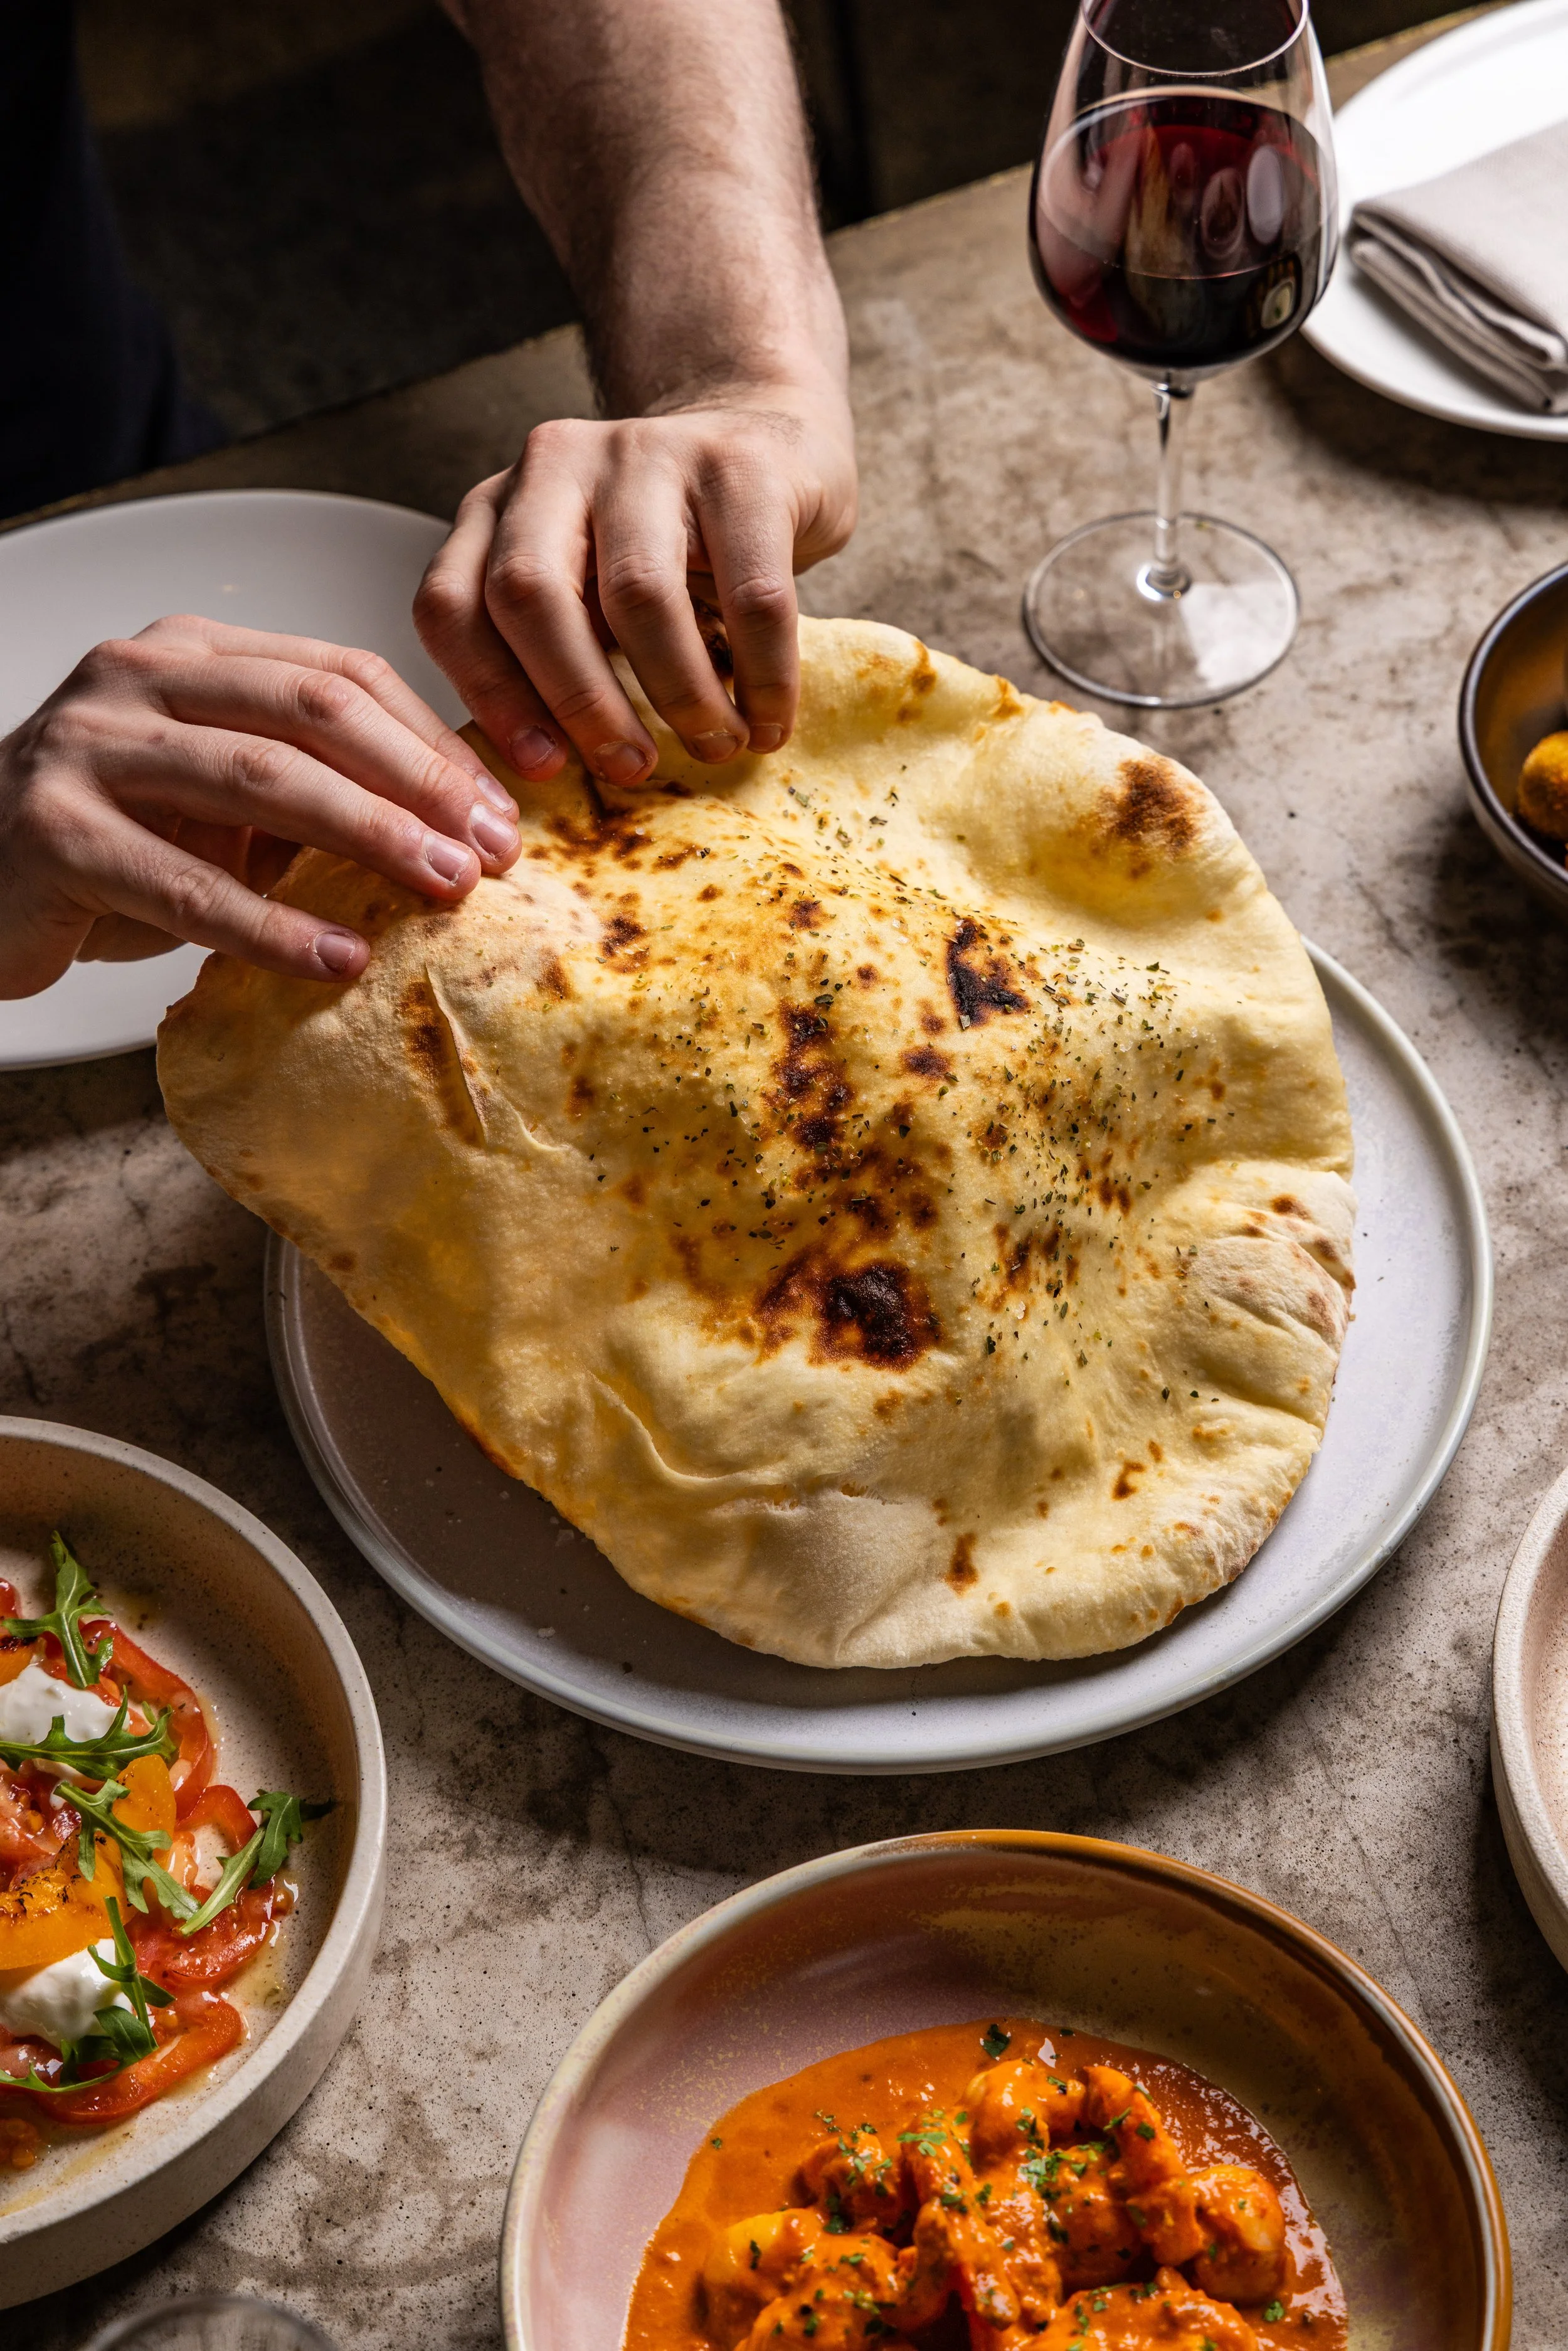
This creates dramatic shadows that fall off quickly on the side opposite the light. This defines texture and shape beautifully (e.g., the crust of the pizza or the grill marks on the steak).
Style 1: Backlight (More Dramatic)
Placed directly behind the food, aimed toward the camera.
Creates a bright rim of light around the food and long shadows reaching toward the camera. This results in the highest contrast and most dramatic fall-off.
In the provided image above, the softbox is positioned to the left of the table, acting as a strong side light that rakes across the food.
3. The Absence of Fill (The "Moody" Element)
Crucially, in a one-light setup for a dark and moody style, there is NO reflector or secondary light source (fill light) is used to bounce light back into the shadows.
By allowing the light to fall off naturally, the shadows remain deep and dark.
The dark, non-reflective surfaces (like the dark brick wall and the table texture) act as negative fill, absorbing any stray light and ensuring the background remains deep and underexposed, focusing all attention on the lit subject.
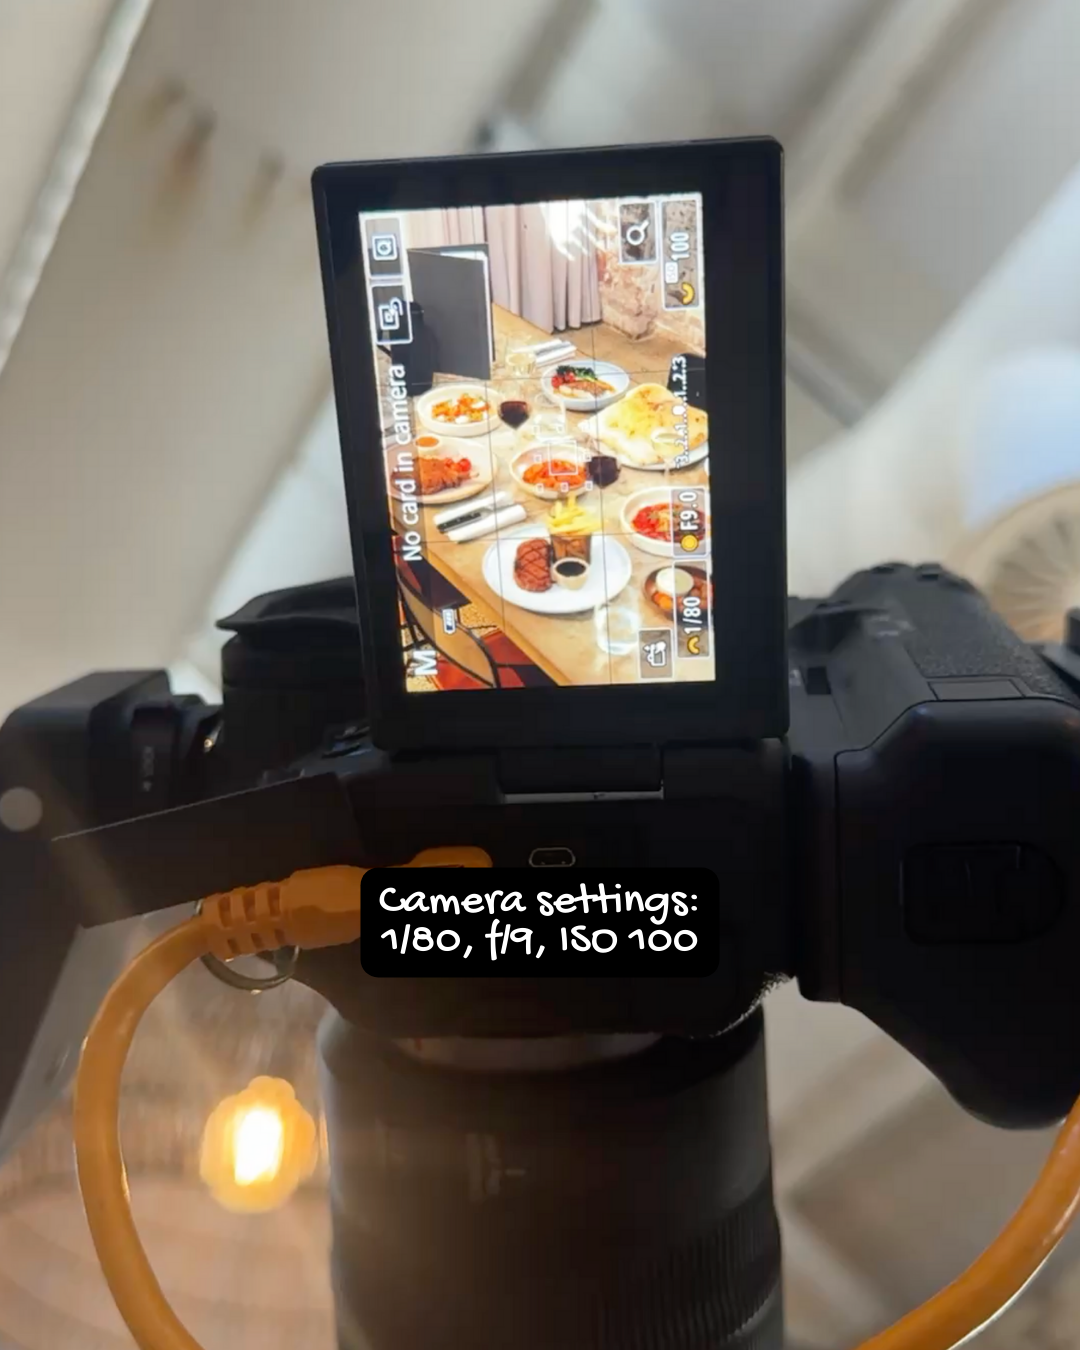
For Controlled Exposure: Try using f/9 and low ISO 100. Only the flash registers, giving you total control over light.
Think Directionality by placing the light to the side. This creates strong shadows and deep contrast that define shape and texture.
Consider Light Quality: Using a large Softbox will soften the light source, making the shadow transitions smooth and preserving detail within the shadows.
4. The Essential Gear
For this particular setup, the following professional kit was used to ensure high-quality results and maximum control:
Camera: Canon R5
High resolution and excellent dynamic range are critical for capturing shadow details.
Lens: RF 24-105mm F4
A versatile zoom lens that allows for quick adjustments to composition without moving the camera.
Lighting: Profoto B10 plus + 60x90cm softbox
A powerful and portable professional strobe with a large softbox for soft, directional light.
Support: Sirui tripod W-2204
Essential for keeping the camera absolutely still at slower shutter speeds and ensuring precise composition.
5. The Camera Settings
To get the most out of the professional strobe and manage the light perfectly for a dark and moody look, here were the manual settings:
Shutter Speed 1/80. Fast enough to freeze any ambient movement, but slow enough to allow the full flash duration to register.
Aperture f/9. A narrow aperture to ensure maximum depth of field, keeping all the plates and textures sharp from front to back.
ISO 100. The lowest native ISO, guaranteeing the cleanest, most noise-free images with the best possible dynamic range.
By using a low ISO and a narrow aperture, the external flash becomes the primary, controllable light source, allowing the photographer to sculpt the light and shadows precisely to achieve the dramatic, moody effect. The result is a crisp RAW photo ready for precise adjustments in post-production.
Essential Editing Techniques for a Dark & Moody Style
The challenge of dark and moody photography is losing detail in the shadows even after attempting to lift them in editing. The key to successful dark and moody post-processing is using local adjustments to sculpt the light and bring out textures where the light does hit, while intentionally deepening shadows everywhere else.
Here are the most important editing steps, often performed in software like Lightroom or Capture One:
A. Tonal and Contrast Adjustments
This step is crucial for achieving that "great texture and decent level of contrast" you mentioned:
The S-Curve (via the Tone Curve Tool): Apply a subtle S-curve. This involves darkening the shadows and brightening the highlights simultaneously. This instantly boosts overall contrast and drama.
Adjust Shadows and Highlights:
Shadow Slider: Carefully lift the shadows slightly to reveal important details (like the texture of the steak or the fold of the flatbread) without making the image look flat or muddy.
Highlight Slider: Lower the highlights to prevent any areas (especially reflective surfaces or the food itself) from being "blown out," preserving that crucial texture.
Clarity: Use the Clarity slider sparingly. It adds mid-tone contrast that enhances textures (e.g., the crust on the bread or the char on the steak), making the food "pop."
B. Sculpting with Local Adjustments
The secret to a professional, non-muddy moody photo lies in controlling where the viewer's eye goes using selective edits:
Vignette: Add a subtle vignette (darkening the edges/corners). This is a powerful tool to bring the viewer's focus directly to the main subject in the center of the frame.
Radial Filter or Adjustment Brush: This is the most critical technique to control the light fall-off.
Use a Radial Filter (or mask) to create a bright, focused circle over your hero food (e.g., the center of your table spread). This emphasizes the single light source.
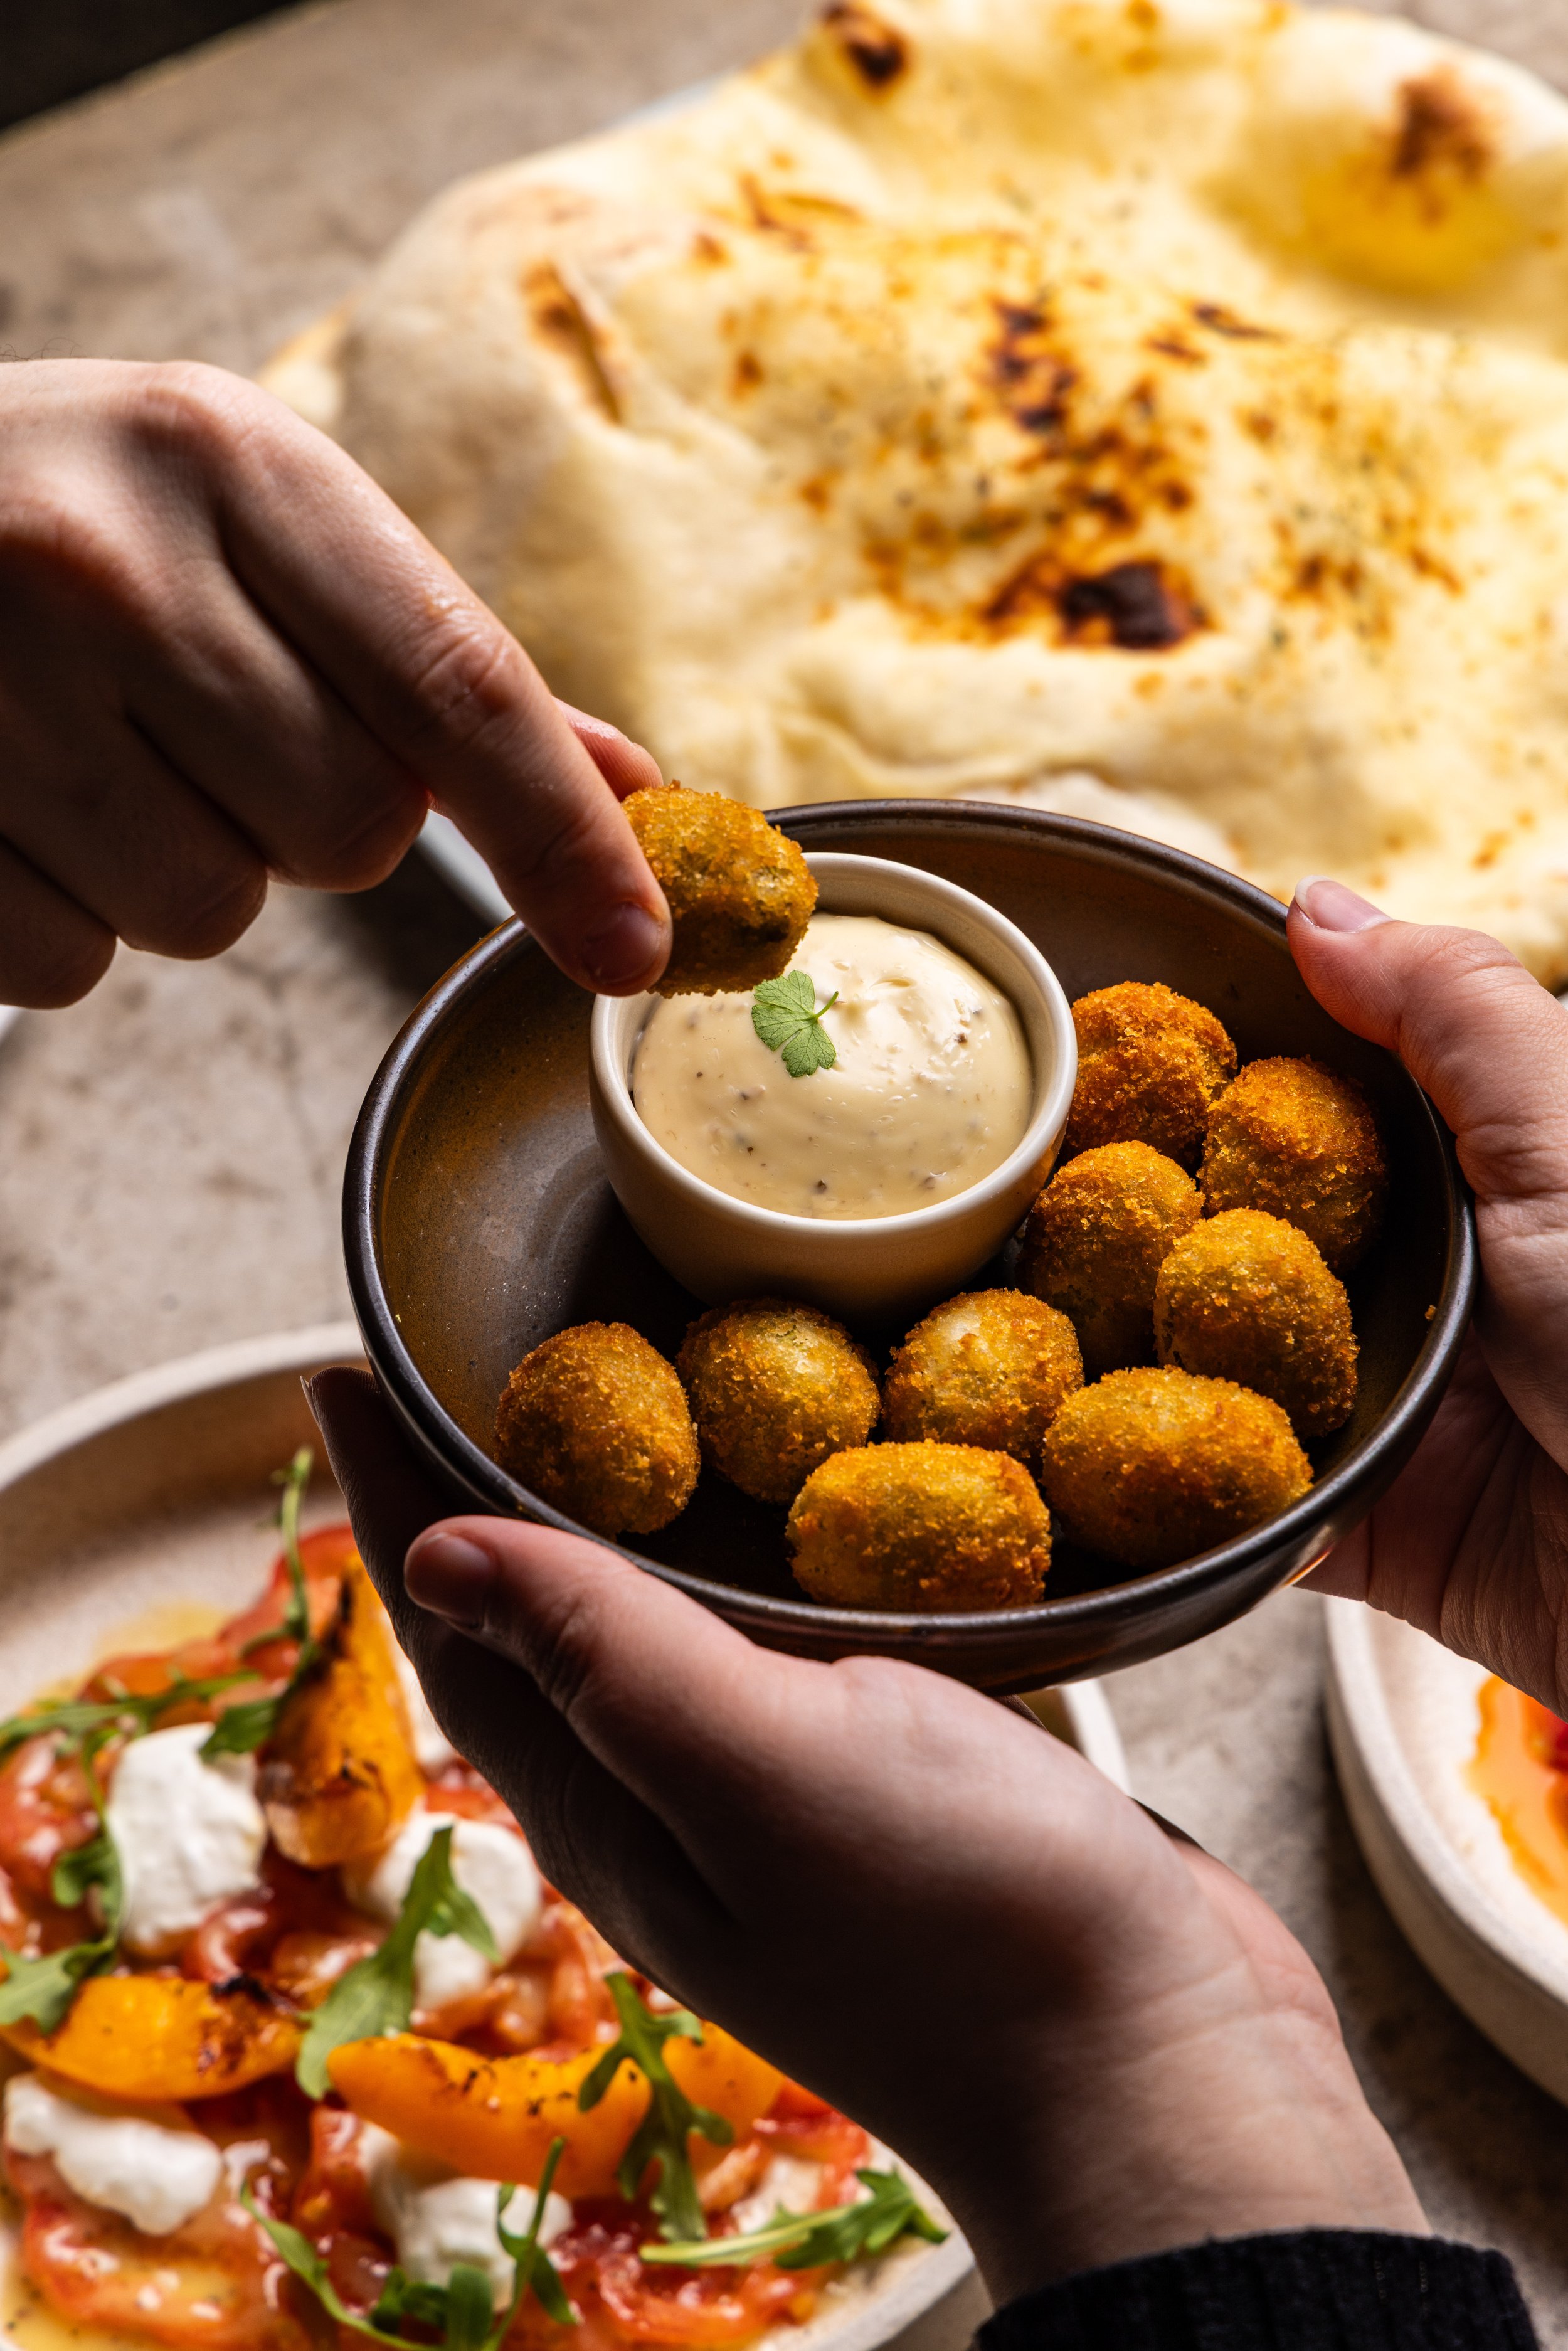
Use the Adjustment Brush to "paint" minor adjustments, such as brightening a specific garnish, bringing back details in a dark corner of a plate, or adding extra texture (Clarity) to the star dish.
C. Color Grading for Mood
To enhance the moody atmosphere and enrich the dark tones:
Saturation and Vibrance: Slightly boost Vibrance to make colours pop without over-saturating.
Split Toning / Colour Grading: This is an advanced step that adds a sophisticated finish:
Shadows: Add a very slight cool tone (a greyish blue or deep cyan) to the shadows to deepen the mood and make the warm food colours stand out.
Highlights: Ensure the highlights remain warm (soft yellows or magentas) to emphasise the food's appetising nature.
HSL (Hue, Saturation, Luminance): Individually adjust the Luminance of certain colours (like the red in the wine or the yellow in the fries) to control their brightness without globally affecting the image's exposure.